Home

Monday, August 8, 2011

OPI I Lily Love You

Hello! I am back!! :)

     It was getting a little tedious blogging especially in the summer so I had wanted to take a little break. But today I tried another untried of mine and I thought I would share it with you all! It is a lovely chunky flakie from OPI called I Lily Love You. This came out recently in the summer 2011 Nice Stems collections. Although I am sure this was greatly posted by many other bloggers the second it came out, I figure one more post won't hurt. 
     As you may know, I love blingy nails and flakies go under that category lol. When this first came out, I knew I had to get it. It is a purplish-pink jelly with flakes and glitter suspended throughout. Very pretty. The flakes are different sizes and some are downright BIG! But I think overall it adds more character to my nails and I am thinking of getting a back up (my first if I do!) since it seems like this can be used up so easily.

    Enough babbling, and onto the nails itself! I started with one coat of NK Burberry. It is a bright raspberry red. Then added a thick coat OPI ILLY. And finished with a coat of Seche Vite.


Thanks for looking!

Wednesday, July 20, 2011

Forever 21 has flakie polish!!

Oh em gee!! On my recent trip to Forever 21, I found flakie polish in their bins of polish! I was very excited to see them, although I think I might have bought the last one. It is Love & Beauty in Light Green and is different shape flakies suspended in a light green jelly with shimmer. Quite pretty and for only $2.80 USD, it was quite a cheap thrill. (I hope I come across more colors!)


Now onto the pictures!!


I used a base color of Sinful Color in Envy. It is a green that borderlines on dusty green. I used two coats.


Then topped it with my lovely flakies, and Seche Vite.


Look at those flakies!!


Sorry for so many pictures! As you can tell, I love this find. 


Have you found flakies at your Forever 21? Did you find them in a different color?

Thanks for looking!

Thursday, July 14, 2011

Nailtiques formula 2 ... day four

I haven't posted in a few days because I am tending to my nails. The tips of my nails peel often especially on my right hand - I guess because I use that hand more often. I have heard of Nailtiques formula 2 and of Nailtek 2 and thought I would give it a try.  Formula 2 is for weak, peeling nails which is explains what I have.   Whats worse is that when I see peelage, I start picking and peeling it off which results in thin weak nails in that area which causes my nails to split and break. Its sad, I know. 

They are expensive for such a small bottle (1/4 oz ) and you use it everyday so it runs out quickly. I bought mine at a beauty supply store for $9 but I have heard they run close to $14. 

I started my treatment on Monday and today is day four of TLC. I kind of see a difference in the peelies but I still have peeling which pretty sucks even though I know I haven't used it for long and my nails haven't grown out yet. I guess I'm desperate for improvement lol. I also have not painted my nails with any color polish because it does say that it may not work as well and that using polish with hardeners can possibly end up damaging your nails. 


I guess I will wait it out and see how it goes, but I don't think I can last another day with naked albeit shiny nails. So I will use this as a base and follow up as a top coat the next day. :)

Have you used this? What were the results? Love / Hate?

Sunday, July 10, 2011

cupcakes galore!

As you know, I love nail art. One that I think is simply adorable are cupcake nails. So I gave myself some today :)

I started with three coats of OPI Isn't That Precious? Then did the tips in Essie Castaway. I used a striping brush and made lines on the tips with NK Really White and using the white, I.made cupcake tops. After that, I used a dotting tool to make confetti dots on my cupcake with Essie Castaway. Last but not least, I made my cherry a sparkly one using a dotting tool and Wet n Wild Sparked.


Isn't it adorable?

Wednesday, July 6, 2011

Love & Beauty Blue Green

Forever 21 has been producing nail polish for awhile now and this is the second polish I have purchased there. I think the quality is pretty good and the price is perfect at $2.80 USD. They have an array of colors which is great when you have a design in mind but don't want to spend too much money. Their best are their multi chrome colors. Blue Green is one of them and its the only one I saw and knew I had to get. Its a multi chrome of shimmery glass flecks. It reminds me of a mermaid's tail. Although in the bottle, you can see the two colors clearly, on the nails you mostly just see green. In certain lighting though, I do see the purple blue tint but I couldn't capture it on camera.


It was a little sheer so this was applied in three coats. The first picture shows the multi chrome in the bottle and the last picture kind of shows how sheer this color can be.


Monday, July 4, 2011

China Glaze Sea Spray French Lightning Bolt

Lately I have been getting inspired by many nail blogs. Just the other day, I discovered a fellow Makeup Alley Nail Board user who started a lovely blog - http://nailside.blogspot.com/ . She is famous for her awesome nail artistry and especially for her lightning bolt tape manis.

I usually suck pretty bad at getting crisp, sharp lines when using tape but I decided to give it one more shot. It worked pretty well this time! So I will definitely be doing tape manicures more often!

I started with two coats of China Glaze Sea Spray. It is a dusty grey/blue color with a very slight shimmer to it. Such a pretty color. I fell in love with this color when it first came out but the first time I used it, I almost wanted to rip my hair out. It was my first time using China Glaze (I don't live near any Sally Beauty Stores), and I thought my nails just weren't a fit for their brand - it was very goopy. I even put in polish thinner. But this time, I didn't use a base coat and it worked as fine as any other brand I own.


Anyways, I then followed Nailside's directions (which you can get here: Tutorial - Lightning Bolt French ) for the french lightning bolt. I wanted to do the double lightning bolt but I figured it required too much tape, and I wanted something more simple for trying tape manicures again.

For my funky french, I used NK in Satin Silver. Then applied SV after I removed the tape. 

It took forever to take pictures of the silver. It kept catching in the light and wouldn't show up sharply and clear. So I weeded my shots out and this is what I was left with:


How do you like tape manicures?

Sunday, July 3, 2011

Fourth of July mani

Tomorrow is fourth of July so I figured today is just a good a day to do my patriotic nails. I'm not a fan of flag colors so this may come off midday tomorrow. But hey, at least I was patriotic for a day right?

I used NK in Really White, Brucci in red but the label fell off so I don't know what the name is called, and LA Colors in Wired. For this design, I used a striping brush to make my red stripes and a star nail art sticker that I had found laying around.

I started with three coats of NK Really White on all my fingers except my ring finger which I used LA Colors Wired. The I used a striping brush to make vertical stripes on the white and placed the sticker on my ring finger. Next, I completed the look by lining my tips with LA Colors Wired and Brucci on the ring finger.

The end results reminded me of Uncle Sam lol. I guess its cool but its a bit much for me. I've never been a fan of flags as decorations outside of the flag itself.


Friday, July 1, 2011

Essie St Lucia Lilac floral

I have always liked the look of floral nails. But for some reason, I keep forgetting about them when I am thinking of nail art ideas. However, last night as I was looking through blogs, I came across the floral design again. Veronica from Chic and Shiny inspired me to make me try out vintage florals. Check out her blog for her really cute floral tootsies!

I realized floral nails are usually with a mint green base, but I wanted to have light purple nails which is why I chose Essie in St Lucia Lilac. It was streaky and a bit thick even though I had put thinner in it. I gave it two coats, the second coat being a little thicker.


Then I added my flowers by dabbing the brush in a circle in random spots. I used Funky Fingers in Chesire for the flowers. Then i added a tad of white to the circles and used a dotting tool to swirl the colors and make the circles look more flowery. Lastly, I completed my flowers with leaves using a dotting tool and Sinful Colors in Envy.


I think they are cute! 

Have you tried floral nails? 

Thursday, June 30, 2011

Blog love and awards!

I have been pretty busy lately but I want to give a GINORMOUS thank you to all the blog love and tags I have been given. I hate to stray from the rules, but I will be clumping all these awards together if you dont mind and just posting a few blogs that I love :)

Big thanks to Veronica for giving me these awards:


And another big thanks to Laura for giving me this:


I feel awfully special and quite a happy camper ! :)

Both these bloggers are worth the time to check out - so if you haven't already, get on it!!


And now for the blogs that I am loving :


EDIT: I forgot to add that the names of the bloggers that tagged me are linked to their site! So don't go crazy trying to figure out where their site is! =)

Wednesday, June 29, 2011

China Glaze Kaleidoscope Him Out

*PIC HEAVY!*

Sorry for being away for a bit, but I'm back =)

It seems to be getting sunnier these days and I haven't had holo nails in awhile. So today seemed the perfect day to get my holo on! I had bought China Glaze Kaleidoscope Him Out awhile back on EBay and haven't tried it on yet so that's the polish I decided on for today. I loved 'He's Going in Circles' and knew I had to buy more from the kaleidoscope collection.

This was three coats - and each layer came out watery and thin. Especially the first layer...it was practically non existent. After two layers, I put on Sally Hansen Insta -Dri top coat which is the one in the red bottle. Then I added a last layer of Kaleidoscope.

The results were holo-rific!! I love!!


Sunday, June 19, 2011

Sinful Colors Innocent

Remember how I had been so excited to finally buy Sinful Colors in Innocent? Well the last try using it as a konad color didn't show up well so I decided this time to use it as a base color.

I love this color because it reminds me of Shrek. It is such a fun and bright color, perfect for summer. I got this perfect in two coats and then used Fresh Paints in Envied as the image color. I stamped with m74 image plate. I think this turned out quite fun looking. =)


Saturday, June 18, 2011

OPI Hot & Spicy gradient

I've always wanted to try gradient nails. But I'd look into my stash and somehow not find coordinating colors. But at the end of last month, I wrapped up my epic failure on my low buy with buying Wet n Wild in Sunny Side Up. It is a tangerine orange that came along with one of the wonkiest brushes ever. Now don't get me wrong, I love bold colors, but plain orange just doesn't appeal to me. I think its because it reminds me of a pumpkin.

Anyways, so this is when I thought of trying a gradient mani. I picked the color that was next to Sunny Side Up which was OPI Hot & Spicy. It is a bright coral orange. Very preety on its own too! I painted my WnW in three coats, and used a small sponge to sponge on OPI. To top this off, I lightly brushed WnW in Kaleidoscope on the tips. It is a holo glitter. I loved the results!!


This is the wonky brush. Usually I don't mind WnW and their cheap brushes...I mean, you pay for what you get. But this was borderline dinky because I have seen equally cheap polishes with good brushes.

Friday, June 17, 2011

Top 10 Award!! Whoo hoo!!

YAY! I've been given my first award! Huge thanks to Cristina from Opinionated Little Finger for choosing me!

I am very excited about this :)


The Top 10 award rules:
1. Thank the person who tagged you and link to their blog.
2. Put the Top 10 Award logo on your blog.
3. List your top 10 cosmetics.
4. Choose 10 bloggers to tag, link to their blogs, and let them know.

My top 10 cosmetics:

1. Maybelline Falsies Waterproof Mascara - absolute must have in my makeup train case. It is amazing in giving volume and length.
2. Wet n Wild MegaLast Lipstick in Bare It All - Best nude matte lipstick for cheap .. $1.99!!
3. EcoTools Bronzer Brush - So soft and perfect for mineral makeup, blush, bronzer, powder, or buffing. This brush does it all.
4. Revlon eyelash curler - does it's job well and is fairly cheap
5. Milani Infinte Liquid Eye Liner - after tons of research and test tries, I have discovered this is the holy grail of waterproof eyeliner. It will not budge!
6. Estee Lauder Automatic Eye Pencil Duo in Black - I have used this eyeliner since I was in junior high. It is my go to liner. And it is refillable which is great.
7. Tweezerman pointy tweezer - No other tweezer works for me now.
8. Smashbox Photo Finish Oil-Free Primer - I use this before putting on my foundation and it does wonders. Well, maybe not wonders but I love it.
9. Revlon ColorStay Mineral Finishing Powder in Suntan Matte - I wish this wasn't discontinued. It is a sheer all over bronzer that just warms up my face.
10. Biore Pore Strips - I am obsessed with using these. I love ripping it off and looking at all the grossness it pulled out and feeling much cleaner. Haha, was that a little tmi?

And now here are the blogs I will pass this award on to:


Natalie @ http://nattyngeorge.blogspot.com/

Polished Perfectionist @ http://the-polished-perfectionist.blogspot.com/

Ash-Lilly @ http://ash-lillyslacquerlust.blogspot.com/

Ice Queen @ http://icynails.blogspot.com/

Glitta Gloves @ http://glittagloves.blogspot.com/

A Polished Touch @ http://apolishedtouch.blogspot.com/

Nicely Varnished @ http://www.nicelyvarnished.com/

Melissa & Amanda @ http://madmanis.blogspot.com/

Brooke @ http://www.caracita.com/

Nailasaurus @ http://nailasaurus.blogspot.com/

I love all their blogs - each one is special and worth checking out if you haven't already!

Monday, June 13, 2011

Funky Fingers Snakeskin

Today I have for you Funky Fingers "Snakeskin". It is a pretty oil slick olive with a shimmer foil look to it. It applied like a dream and would probably be okay with one coat, however I used two. It seemed a bit boring and I felt an urge to do something to it. I had wanted to do another acrylic nail art on it but I wasn't in the mood. Then I thought maybe a Konad image on it would be nice but I didn't want a cream polish to overpower this shimmer like foil. So I decided on tips in a dark green. I chose Sinful Colors in "Last Chance". I still can't manage doing French tips using tape so as usual, I freehanded this.

Have you tried "snakeskin"? Did you put any designs on it?


Wednesday, June 8, 2011

OPI Steady As She Rose with blingy 3D art

I was planning on doing holo nails today since its super hot and sunny. But at the last minute I changed my mind and went with 3D nail art. It always takes awhile for me and this was my second time using arcylic to make 3D art. I used a mold the last time and it had worked great but for some reason todays mold didnt bring me pretty art - I wanted to make bows. After a few tries, i ripped what i had already done off and started over without the mold. Freehanding my bows was a lot easier and faster.

I started with two coats of OPI Steady As She Rose. Followed by a coat of Seche Vite. Then using pink acrylic powder and liquid, I made bows on each nail. When I was done, I added a pink rhinestone to the middle of each bow and sealed with another coat of Seche Vite. Then because I love blingy nails..the blingier the better.. I added extra rhinestones to my ring finger. I used clear, yellow and gold stones for that and once again sealed with SV. Yes that's lots of top coat but hopefully no stones will fall off.

Has anyone tried acrylic art? How do you like it?

Sunday, June 5, 2011

Revlon First Class

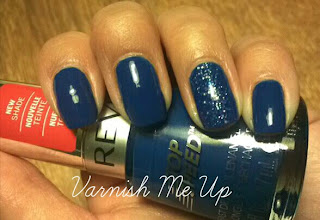
The other day while browsing at Target, I found Revlon Speed Dry in 'First Class'. This is a dusty blue. Its a mixture of royal blue without coming out as dark as 'Revlon Royal' and its a dusty sailor blue without being bright or light. It is the perfect blue in my opinion and I have been looking for a color like this for the longest.
When I got home,I was searching for swatches but couldn't find any which makes me wonder if this is a brand new shade. So if anyone has seen this, let me know!
I took a few pictures because I couldn't capture the greatness of this polish. However the second pic seems the closest. These are two coats but can be done in one if your carefull. I also gave my Mani accent nails with Sinful Colors in Hottie.

Indoors in low light:

Indoors under light: (this is the closest to color IRL)

Outdoors in shade:

Outdoors in slight sun:

Wednesday, June 1, 2011

OPI navy shatter

I never was into shatter or crack. Butttt, when OPI came out with their new shatter colors, I decided it was time to dip my nails into some crack : ) . I finally tried this today and honestly I'm not too excited about it. I got navy shatter and I wished it would appear as a brighter navy. Perhaps the Sally Hansen crackles might've been more what I was looking for.

I used Sally Hansen CSM in Yellow Kitty. This was three layers and it might've needed four if I wasn't going to layer something on top. Then I applied my shatter. The thicker the coat, the larger pieces in shatter. But it was hard to apply a thick layer without redipping into the bottle.

What are your thoughts on shatter and crackles?


Tuesday, May 31, 2011

OPI Planks A lot

I finally got the Pirates of the Carribean collection by OPI! I was very excited when I found them. So I grabbed Planks A Lot, Steady As She Rose, Skulls and Glossbones, and Mermaid Tears. I already swatched Mermaid Tears but had forgotten to take pictures.

Today I have for you Planks A Lot. It is a dusty lavender. I have been looking for a pretty lavender purple and this fits the bill. This was perfect in two coats.

I gave this mani a bit more glitz because I like my nails so be glitzy lol. I added a top coat of Nfu Oh 49 and Security Vite on top.